Getting Your Foot in the Door in the World of Software Development

This is written with the intent to help my fellow readers get their foot in the door in software development. The question is, how can I work towards making a decent living in the world of software development? Obviously, the most important thing in any career is a good work ethic. Hard work and hours and hours spent studying will definitely increase anyone's chances of being successful in their area of expertise. Of course, there are absoultely no guarantees in life and all that time could have been spent studying and working with five million job applications sent with not one decent job offer.


Of course, we want to decrease the chances of this from happening as much as possible. That's where hard work comes in. Of course, luck will also play a factor but we can't control that, so let's talk about what we *can* control. Even viewing this from a mathematical or probabilistic lens, if 30% of success comes down to chance and 70% of it comes down to the person (i.e., the resume, the work ethic, the past works, the reputation of the school that the person (hopefully) attended, the grades achieved in school, the awards, the scholarships, etc.), since we can't change the 30% that stays constant, then we can maximize the remaining portion of the probabilistic pie to increase our chances of success. And, we know that we have fully-employed software developers and engineers in the world that are employed in real, big, and successful centibillion or trillion-dollar market capitalization corporations (e.g., FAANG—Facebook (now Meta), Amazon, Apple, Netflix, and Google (now Alphabet)), so we know that we are not being asked to build another planet here.


The world after postsecondary school may be intimidating for students that did relatively well in postsecondary school with few barriers to success (aside from hardcore studying). I want to best assist my readers in breaking down a long and arduous journey towards a success that is not guaranteed to be there into manageable sections:

1) The different kinds of software development.

2) The most sought-after tech skills in each type of software development.

3) How to best acquire the vast amounts of knowledge required in the highly sought-after skills in a condensed time frame (six months).

4) How to create an eye-catching portfolio of past works to present to your future employers.

5) How to gain experience by freelancing.

6) Job boards that I recommend.

7) Examples of real work that you would be doing at a business or company.


1) The Different Kinds of Software Development

I want to first explain the different kinds of software development that exist. I would say that almost all software development can be neatly categorized into three different kinds of development: mobile app development (iOS/Android), web development, and desktop software development. With that in mind, I recommend searching job boards and freelancing platforms for current job openings to see which kind of software development is most in-demand and choose one that you want to become an expert in.


2) The Most Sought-After Tech Skills in Each Type of Software Development

We can now discuss the tech skills that are most in-demand in each kind of software development. Firstly, in mobile app development, which can be further divided into iOS app development and Android app development, I would say that to code iOS apps well, you would have to be good with swift. For Android apps, you would have to be good with Java. For web development, you would have to be good with both front-end web development and back-end web development which mainly consists of HTML5, CSS3, JavaScript, jQuery, AngularJS 8, Bootstrap 5, and AJAX (for front-end) and PHP 8, JSON, SQL, MariaDB, MySQL, Python 3.10.5, Selenium, and Heroku (remote app deployment) (for back-end). For desktop software development, you would have to be skilled with C/C++, Java, Python, Ruby on Rails, PHP, Perl, and more.


3) How to Best Acquire the Vast Amounts of Knowledge Required in the Highly Sought-After Skills in a Condensed Time Frame (Six Months)

I would now start with acquiring the knowledge necessary to perform work in this field at an all-star level. This means exhausting all resources that you have available to you. This includes YouTube (tutorials), search engine (e.g., Google) searches, Stack Overflow questions and answers, W3Schools.com modules, and textbooks. For textbooks, I personally used and recommend the Sams Teach Yourself series. After becoming proficient in the tech stacks that are highly sought after in today's job market (e.g., PHP 8, JSON, SQL, MariaDB, MySQL, Python 3.10.5, Selenium, and Heroku (remote app deployment) (for back-end) and HTML5, CSS3, JavaScript, jQuery, AngularJS 8, Bootstrap 5, and AJAX (for front-end)), I would start producing a portfolio of past works to present on freelancing platforms.


4) How to Create an Eye-Catching Portfolio of Past Works to Present to Your Future Employers

Here are the following works that you can complete for your portfolio:

> Use python and selenium to scrape eBay for all models of the vehicle make Audi produced in any year that sold in any year. Then, output the average price of the Audi (all models and production years and sold in any year).

Prerequisites:

- Basic understanding of the latest version of python

- Knowledge of dynamic website scraping using a python module called Selenium


> Producing a login and registration page with a fully-functional back-end database information storage and retrieval system

Prerequisites:

- HTML5, CSS3, JS, and Bootstrap 5 to build the front-end

- MySQL, SQL, and PHP 8 (to execute SQL statements on the back-end)

Additional Information:

The MySQL database would include a column for the username and another column for the password (just two columns for this beginner work purpose). The password will be hashed. I recommend following an online guide like https://speedysense.com/create-registration-login-system-php-mysql/. The process would basically involve making the database, a table in the database with two columns, then inserting data into the database. To be more specific, it would involve producing an HTML5 form which upon submission will direct to a PHP 8 page that will use the data from the user-submitted HTML5 form to produce SQL statements that use that data which will be inserted into the database that we have created. The exact details on this process are highly technical and so I recommend the link that I mentioned previously and also referring to YouTube tutorials and the Sams Teach Yourself textbook for any questions.


5) How to Gain Experience by Freelancing

To gain experience by freelancing, I would start by searching for freelancing platforms that require software developers or software engineers on search engines like Google. I personally use and recommend freelancer.com, guru.com, upwork.com, and fiverr.com. Setting up a profile on these freelancing platforms to get experience for your full-time permanent job at a bigger company should be a doable task if you completed the previous steps. I would start by presenting your portfolio of past works that you think future employers would like and then filling in your education credentials. I would also include any previous related work experience (if any). The average employer must notice that you are capable of producing good work before hiring you.


6) Job Boards That I Recommend

My personal recommendations are monster.ca, indeed.ca, angel.co, linkedin.com, and ziprecruiter.com.


7) Examples of Real Work That You Would Be Doing at a Business or Company

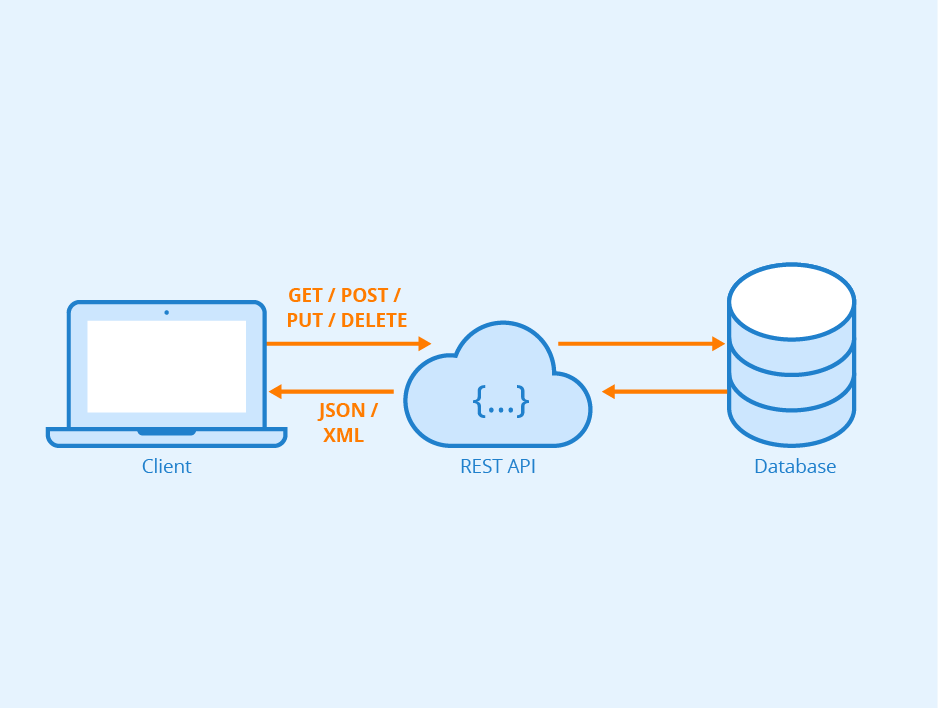
In the real world, you would most likely be asked to work in an environment in which businesses or companies are selling products or services. An example business/company we will study is Beauty Collection Inc. It's a store located in Toronto, ON. In this case, a worker might be asked to use a front-end web development tech stack and a back-end web development tech stack to work on their existing sales platform.

You would work on either the front-end, the back-end, or both (full-stack). Front-end is basically what you see on the front (the side facing the client) and back-end is what you don't see (e.g., the data stored on the back-end). In the case of Beauty Collection Inc., this would involve data of the products (e.g., hair products) being stored in a database (e.g., MySQL). This would then later need to be retrieved using something like SQL statements, transferred to the client side, and then finally displayed on the client side/front-end.

Hopefully I have helped my readers break down their journey into success in the world of software development into manageable sections. I encourage my readers to think of their journey as long-term and not expect immediate results :).

How to Construct a Marketing Campaign and Send Marketing Campaign Emails Using Python to Grow a Business

We are going to touch briefly on the topic of constructing a marketing campaign and sending marketing campaign emails using python to grow a business.


Constructing a Marketing Campaign

I personally use and recommend campaignmonitor.com to construct a marketing campaign. I would start off by signing up on the platform, logging in, clicking the user avatar area at the top right beside the user's full name, then clicking "My templates" on the dropdown that follows. From here, you can click the "Create a template" button and choosing "Choose a design". You can now select any design that you like and modify the theme significantly to produce a marketing campaign that you and your customers will like. After creating the campaign, click on it then a popup should open with the marketing campaign, at which point you can right click and click "View Page Source". Now, you can proceed to finally select all the code using ctrl+a (Windows) or cmd+a (Mac) and copy it to your clipboard (ctrl+c or cmd+c). Here's an example marketing campaign that I designed in the past:

Now our next task is to make the source code with all the CSS inline for proper rendering on all email clients. https://templates.mailchimp.com/resources/inline-css/ can be used for this purpose.


Sending Marketing Campaign Emails Using Python

This next step will go into detail on how to send the marketing campaign that we produced to a list of emails using python. The list of emails for the sake of this tutorial's purpose will be an array (called list in python) of test emails arr=[testemail1@gmail.com, testemail2@gmail.com, testemail3@gmail.com]. We will be sending emails using the following guide: https://www.interviewqs.com/blog/py-email. The important parts are to set up two-factor authentication on your Gmail account and then setting up an app password. Online guides for how to do this are available online. After the Gmail account is set up, the next step is to create a python file called PythonMarketingCampaign.py and enter the guide's code:

import smtplib
from email.mime.multipart import MIMEMultipart
from email.mime.text import MIMEText
from_address = "from_email@gmail.com"
to_address = "to_email@gmail.com"
msg = MIMEMultipart('alternative')
msg['Subject'] = "Test email"
msg['From'] = from_address
msg['To'] = to_address
html = """
Campaign
"""
part1 = MIMEText(html, 'html')
msg.attach(part1)
username = 'example_email@gmail.com'
password = 'your_password'
server = smtplib.SMTP('smtp.gmail.com', 587)
server.ehlo()
server.starttls()
server.login(username,password)
server.sendmail(from_address, to_address, msg.as_string())
server.quit()


Our next course of action is to bring our attention to the parts of the code that are in bold. We have to modify these parts in bold to fit our account information and campaign. The first modification to the code should be replacing from_email@gmail.com (in bold) with the email address that you want to send the email from. The second modification is replacing the to_email@gmail.com part with the email that you want to send the campaign to. The Test email part should be replaced with a proper subject. The campaign part should be replaced with the source code that we produced in the first step. The example_email@gmail.com part should be replaced with the email that you set up earlier. The your_password part should be replaced with your real password. After building our python file and waiting for the code to finish running, the email should have sent successfully.

One important thing to note is that after numerous campaigns are sent from the email, the emails stop landing in the recipient's inbox. A good solution to this problem is to create multiple gmail emails with the exact same setup and creating multiple sender emails. You would have to change emails each time one stops working but this block by Gmail goes away after some time (some hours).

We can now use a list of emails instead of one single email. To do this, we would use python lists to store all the emails in a list variable and put the email-sending parts of the code inside a for loop that goes from i=0 until i is less than the number of elements in the email list.

We will discuss how to acquire a list of emails to send our campaigns to in another post.

Retrieving Emails From Instagram Using Python

We will now discuss how to retrieve emails of followers and following of an Instagram account. This process involves analysis of network requests. For the sake of this tutorial, we will use the Instagram account nba and scrape 100 followers and following of that account (200 accounts in total). We will first log in to our Instagram account and navigate to our profile (the page with all your Instagram posts). Readers are requested to right click on the page and click "Inspect Element". After this, please click "Network" on the top header tabs to inspect outgoing and incoming network requests. Click Fetch/XHR then click the followers on the current Instagram page. When a popup appears with the first 12 followers of your followers list, you would see an API call that goes by the name, "?count=12&search_surface=follow_list_page". Now, click on that and copy and save the Request URL somewhere (located in the General section) (https://i.instagram.com/api/v1/friendships/12866142324/followers/?count=12&search_surface=follow_list_page). Now, scroll down to the "Request Headers" section. Copy and save that entire section somewhere. You would have something like the following:

:authority: i.instagram.com
:method: GET
:path: /api/v1/friendships/12866142324/followers/?count=12&search_surface=follow_list_page
:scheme: https
accept: */*
accept-encoding: gzip, deflate, br
accept-language: en-US,en;q=0.9,fr;q=0.8
cookie: ig_did=E71DFF12-78FE-4E36-A857-411D3EBC3CA4; mid=YhgpsQAEAAEzGYihO9YLzUqvimvu; fbm_124024574287414=base_domain=.instagram.com; datr=jK8aYjTsfTfSYuxpPWg4qXiv; shbid="4009\05412866142324\0541688084380:01f73aa13c60d82ff55cd46179a371b5b3390a77d049481c19dd8fbb8c8effd20d6a7a4e"; shbts="1656548380\05412866142324\0541688084380:01f79cc2a678f824cc7c94271eeef4c19edfd44647cc7130aa7916c42c6249b02e23a3bb"; dpr=2; csrftoken=cgleDXdpZso87BejcHbpxGfMRSLiLyE2; ds_user_id=12866142324; sessionid=12866142324%3Ac4wuJxk0MJZGac%3A2%3AAYcKKcrrUTr84adLXuq7MTb5B9kvWLphWlNw_1RF0Q; fbsr_124024574287414=FIqINIbd-W9-XNMp7i5z8YqxmgNMPAAgQ_SIQNSEaC0.eyJ1c2VyX2lkIjoiMTAwMDA2NDMzMjA3NzgwIiwiY29kZSI6IkFRRGtYaTBxX2s1SnFVTXlOaFMwVjJmckhGSXJrdkNMS2gwTVJEMU9rTzNRLW9HOTRpNVAxNkxDbWtoUUktaHUtU3JkblJ4U3M2SjgxMkJJaERxWWFpOEtSbFh6MGZFVmlxUGQ3MHRyVjRoMWNMTkRWMndsTHh4MjhfbGJVRFBHZVUzbW1zWF9rNXU1OV9kZ1hWVm1YbmN3M3VKY2NGWTV3bVAxb05ZY1lvTXlJX1EzM256SWxfdjlMZWE5UVFod0ktR0pCMjRETmZYVTFWb0IxN29fSDExcDhPN0NKX1pBSTQtb2p0MVpDa3JOUFFkTklrMkZESUdLUzhaV2dGcWpaNkJjVlZtc3NJcG1lc01nQjdJaEQ2MmQxNXozeHZ6QmdmQno4SkhQX21QZ2NqbmFzSUd0ZVpaaV9hLVI2dXpxQVY2N2RoXzJGMUFVX08yNTd3ZDRuRnloIiwib2F1dGhfdG9rZW4iOiJFQUFCd3pMaXhuallCQUcxSnY0MGhPT0tQZm5aQVJlVGV1dVRPS0pjZFVRRGlEMDdRRVpBTk81NjhqaGNIMWtqd0hMcTZjSG1RWkE4dkMzTHZVYm1OTldEUXFkVFpDZHJaQ1Job3FXVlNYNTVPbEtVenBXRXJiR2s0T2tZRkJRN0x2cjhaQ0NFTHdkc1pDbE5sZDhRaFpBWTlWbm1xaHdYd3RwOTZFT0dsRnFJM084eXhBdGpNNlpBYUxGZHBPSm13VU5IVVpEIiwiYWxnb3JpdGhtIjoiSE1BQy1TSEEyNTYiLCJpc3N1ZWRfYXQiOjE2NTY3ODE3NzF9; rur="NCG\05412866142324\0541688317916:01f7f994aa288463eef2181cd5421585b3b00702e3023c296c0e09d2fd0ed15219358ae7"
origin: https://www.instagram.com
referer: https://www.instagram.com/
sec-ch-ua: ".Not/A)Brand";v="99", "Google Chrome";v="103", "Chromium";v="103"
sec-ch-ua-mobile: ?0
sec-ch-ua-platform: "macOS"
sec-fetch-dest: empty
sec-fetch-mode: cors
sec-fetch-site: same-site
user-agent: Mozilla/5.0 (Macintosh; Intel Mac OS X 10_15_7) AppleWebKit/537.36 (KHTML, like Gecko) Chrome/
103.0.0.0 Safari/537.36
x-asbd-id: 198387
x-csrftoken: cgleDXdpZso87BejcHbpxGfMRSLiLyE2
x-ig-app-id: 936619743392459
x-ig-www-claim: hmac.AR3VyUB0_3e8RxFfkD-yplqqFtzGQOoykWzTfHrasaU5Ityn


I now want to shift our focus to actually writing the python code. We will now start by importing all the required modules:

import requests
import demjson


If you are missing any of the required imports which you will find out when you run the code, you can install the missing modules on terminal or command prompt (depending on your operating system). After this is done, we can now write more code. Our next objective is to do a request (API call) for the URL that we discovered earlier which is called an "Unofficial Instagram API Endpoint". The reason it is called an unofficial Instagram API endpoint is because all the official Instagram API endpoints are documented on their official API documentation. This API endpoint is only retrievable after recording the network request after clicking the Followers or Following section. The requests.get line of code will take in three parameters in this case: one for the url, one for proxies, and one for headers. We will declare the first two parameters as variables like the following:

proxies = {
"http": "http://185.230.126.3:14960",
"http": "http://38.132.103.147:39460",
"http": "http://185.230.126.4:9906"
}
url="https://i.instagram.com/api/v1/users/web_profile_info/?username=nba"


The proxies are not required but they help with solving Instagram's spam request detection system. In this case, I only included three fast and working proxies but after rigorous testing, I was able to conclude that the more proxies the better (in terms of how many API calls you can do before getting blocked by Instagram for some hours). You can add more working proxies by installing a free VPN called ProtonVPN and adding the free proxies from there. You can go to a service that determines your IP address and port and put that inside the proxies variable. I personally use https://www.myip.com/ (the two sections to use from here are "Your IP address is" and "Remote Port"). You must use "http" and not "https" for the proxies to work.


We can now add the next section of code which will be the actual get request. It will look like the following:

r=requests.get(url, proxies=proxies, headers={
'authority': 'i.instagram.com',
'method': 'GET',
'path': '/api/v1/friendships/13212100840/followers/?count=12&search_surface=follow_list_page',
'scheme': 'https',
'accept': '*/*',
'accept-encoding': 'gzip, deflate, br',
'accept-language': 'en-US,en;q=0.9,fr;q=0.8',
'cookie': 'ig_did=E71DFF12-78FE-4E36-A857-411D3EBC3CA4; mid=YhgpsQAEAAEzGYihO9YLzUqvimvu; fbm_124024574287414=base_domain=.instagram.com; datr=jK8aYjTsfTfSYuxpPWg4qXiv; shbid="4009\05412866142324\0541688084380:01f73aa13c60d82ff55cd46179a371b5b3390a77d049481c19dd8fbb8c8effd20d6a7a4e"; shbts="1656548380\05412866142324\0541688084380:01f79cc2a678f824cc7c94271eeef4c19edfd44647cc7130aa7916c42c6249b02e23a3bb"; dpr=2; csrftoken=cgleDXdpZso87BejcHbpxGfMRSLiLyE2; ds_user_id=12866142324; sessionid=12866142324%3Ac4wuJxk0MJZGac%3A2%3AAYcKKcrrUTr84adLXuq7MTb5B9kvWLphWlNw_1RF0Q; fbsr_124024574287414=FIqINIbd-W9-XNMp7i5z8YqxmgNMPAAgQ_SIQNSEaC0.eyJ1c2VyX2lkIjoiMTAwMDA2NDMzMjA3NzgwIiwiY29kZSI6IkFRRGtYaTBxX2s1SnFVTXlOaFMwVjJmckhGSXJrdkNMS2gwTVJEMU9rTzNRLW9HOTRpNVAxNkxDbWtoUUktaHUtU3JkblJ4U3M2SjgxMkJJaERxWWFpOEtSbFh6MGZFVmlxUGQ3MHRyVjRoMWNMTkRWMndsTHh4MjhfbGJVRFBHZVUzbW1zWF9rNXU1OV9kZ1hWVm1YbmN3M3VKY2NGWTV3bVAxb05ZY1lvTXlJX1EzM256SWxfdjlMZWE5UVFod0ktR0pCMjRETmZYVTFWb0IxN29fSDExcDhPN0NKX1pBSTQtb2p0MVpDa3JOUFFkTklrMkZESUdLUzhaV2dGcWpaNkJjVlZtc3NJcG1lc01nQjdJaEQ2MmQxNXozeHZ6QmdmQno4SkhQX21QZ2NqbmFzSUd0ZVpaaV9hLVI2dXpxQVY2N2RoXzJGMUFVX08yNTd3ZDRuRnloIiwib2F1dGhfdG9rZW4iOiJFQUFCd3pMaXhuallCQUcxSnY0MGhPT0tQZm5aQVJlVGV1dVRPS0pjZFVRRGlEMDdRRVpBTk81NjhqaGNIMWtqd0hMcTZjSG1RWkE4dkMzTHZVYm1OTldEUXFkVFpDZHJaQ1Job3FXVlNYNTVPbEtVenBXRXJiR2s0T2tZRkJRN0x2cjhaQ0NFTHdkc1pDbE5sZDhRaFpBWTlWbm1xaHdYd3RwOTZFT0dsRnFJM084eXhBdGpNNlpBYUxGZHBPSm13VU5IVVpEIiwiYWxnb3JpdGhtIjoiSE1BQy1TSEEyNTYiLCJpc3N1ZWRfYXQiOjE2NTY3ODE3NzF9; rur="NCG\05412866142324\0541688317916:01f7f994aa288463eef2181cd5421585b3b00702e3023c296c0e09d2fd0ed15219358ae7"',
'origin': 'https://www.instagram.com',
'referer': 'https://www.instagram.com/',
'sec-ch-ua': '" Not A;Brand";v="99", "Chromium";v="102", "Google Chrome";v="102"',
'sec-ch-ua-mobile': '?0',
'sec-ch-ua-platform': '"macOS"',
'sec-fetch-dest': 'empty',
'sec-fetch-mode': 'cors',
'sec-fetch-site': 'same-site',
'user-agent': 'Mozilla/5.0 (Macintosh; Intel Mac OS X 10_15_7) AppleWebKit/537.36 (KHTML, like Gecko) Chrome/102.0.0.0 Safari/537.36',
'x-asbd-id': '198387',
'x-csrftoken': 'fj9AQ15zF615C2GYJE0DlNHJiCR75aBd',
'x-ig-app-id': '936619743392459',
'x-ig-www-claim': 'hmac.AR3VyUB0_3e8RxFfkD-yplqqFtzGQOoykWzTfHrasaU5IniN'
})


As you can see, the first two parameters are the url and proxies, and the third parameter, the headers, is fed in the value of the request headers which we filled in using what we retrieved from our network analysis. However, please note the added single quotations and prefix colons that were removed (i.e., :authority: i.instagram.com is now 'authority': 'i.instagram.com'). The cookie part can actually be condensed by only inserting the sessionid=12866142324%3Ac4wuJxk0MJZGac%3A2%3AAYcKKcrrUTr84adLXuq7MTb5B9kvWLphWlNw_1RF0Q part. Now, we have a revised get request:

r=requests.get(url, proxies=proxies, headers={
'authority': 'i.instagram.com',
'method': 'GET',
'path': '/api/v1/friendships/13212100840/followers/?count=12&search_surface=follow_list_page',
'scheme': 'https',
'accept': '*/*',
'accept-encoding': 'gzip, deflate, br',
'accept-language': 'en-US,en;q=0.9,fr;q=0.8',
'cookie': 'sessionid=12866142324%3Ac4wuJxk0MJZGac%3A2%3AAYcKKcrrUTr84adLXuq7MTb5B9kvWLphWlNw_1RF0Q',
'origin': 'https://www.instagram.com',
'referer': 'https://www.instagram.com/',
'sec-ch-ua': '" Not A;Brand";v="99", "Chromium";v="102", "Google Chrome";v="102"',
'sec-ch-ua-mobile': '?0',
'sec-ch-ua-platform': '"macOS"',
'sec-fetch-dest': 'empty',
'sec-fetch-mode': 'cors',
'sec-fetch-site': 'same-site',
'user-agent': 'Mozilla/5.0 (Macintosh; Intel Mac OS X 10_15_7) AppleWebKit/537.36 (KHTML, like Gecko) Chrome/102.0.0.0 Safari/537.36',
'x-asbd-id': '198387',
'x-csrftoken': 'fj9AQ15zF615C2GYJE0DlNHJiCR75aBd',
'x-ig-app-id': '936619743392459',
'x-ig-www-claim': 'hmac.AR3VyUB0_3e8RxFfkD-yplqqFtzGQOoykWzTfHrasaU5IniN'
})


Our next objective is to use the response from this API call to retrieve the user ID of the Instagram account in question. This is because we require this user ID for the next API call which will be the API call for returning the followers list (and following list). Please note that although we used the headers which we retrieved from the network analysis of clicking the Followers list, the actual URL of the API call was done to https://i.instagram.com/api/v1/users/web_profile_info/?username=nba which is an endpoint with query parameter username=nba which returns a response that contains the user ID (i.e. not related to the unofficial Instagram API endpoint for returning followers or following of an account). This first API endpoint is an official Instagram API endpoint. We can now add the following lines of code:

js_obj=r.content.decode("utf-8")
py_obj=demjson.decode(js_obj)
user_id=py_obj["data"]["user"]["id"]


The first step is to get the response and store it in a variable called js_obj. The next step is to turn it into a python object so that we can then index the necessary indices to reach the user_id. Now that we have the user_id of the Instagram account in question (nba), we can finally do the second API call to retrieve the followers and following list of the account. We will cover how to write the code for the second API call in the code snippet that follows:

r=requests.get("https://i.instagram.com/api/v1/friendships/"+user_id+"/followers/?count=100", proxies=proxies, headers={
'authority': 'i.instagram.com',
'method': 'GET',
'path': '/api/v1/friendships/13212100840/followers/?count=12&search_surface=follow_list_page',
'scheme': 'https',
'accept': '*/*',
'accept-encoding': 'gzip, deflate, br',
'accept-language': 'en-US,en;q=0.9,fr;q=0.8',
'cookie': 'sessionid=12866142324%3Ac4wuJxk0MJZGac%3A2%3AAYcKKcrrUTr84adLXuq7MTb5B9kvWLphWlNw_1RF0Q',
'origin': 'https://www.instagram.com',
'referer': 'https://www.instagram.com/',
'sec-ch-ua': '" Not A;Brand";v="99", "Chromium";v="102", "Google Chrome";v="102"',
'sec-ch-ua-mobile': '?0',
'sec-ch-ua-platform': '"macOS"',
'sec-fetch-dest': 'empty',
'sec-fetch-mode': 'cors',
'sec-fetch-site': 'same-site',
'user-agent': 'Mozilla/5.0 (Macintosh; Intel Mac OS X 10_15_7) AppleWebKit/537.36 (KHTML, like Gecko) Chrome/102.0.0.0 Safari/537.36',
'x-asbd-id': '198387',
'x-csrftoken': 'fj9AQ15zF615C2GYJE0DlNHJiCR75aBd',
'x-ig-app-id': '936619743392459',
'x-ig-www-claim': 'hmac.AR3VyUB0_3e8RxFfkD-yplqqFtzGQOoykWzTfHrasaU5IniN'
})


As you can see in the code snippet, the URL we are doing the get request for is the one that we retrieved during our network analysis, but we are replacing the numerical user_id of our own Instagram account with the numerical user_id of the nba account that we retrieved in the previous step. We also replaced count=12 with count=100. We are basically doing the API call for when a user clicks the Followers tab but for the Instagram account nba. After we do this, we will receive an API response from the API call that has information of 100 randomly-selected Instagram accounts that follow the Instagram account nba. Now, we do something similar for the Following section which I won't describe in detail (since it's almost identical but the word followers is replaced with the word following in the API call URL). Then, we basically store 100 users from each of the responses and store the usernames in a python list.


Now that we have 200 Instagram usernames in a python list, we can now focus on retrieving the emails of those Instagram accounts. This requires the use of an external API service. I searched all over the web and only one seemed to work for me: https://rapidapi.com/hub/. I suggest that my readers sign up and seach for "Instagram Unofficial" in the search field (the search field has placeholder text "Search for APIs"). Our next step is to expand "Users" in the left panel and click "Login". We now enter a username and password to generate a session_key which we can now use for the "Get a user" (information) API call. So, after generating the session_key which should be in the "Results" tab in the right panel, we click "Get a user" in the left panel and enter the session_key that we just generated and the username. Now, we click Test Endpoint and see in the Results tab that we will have an email associated with that account (if it has an email). One important thing to note is that only the "public_email" (the public business email) can be retrieved. The private email cannot be retrieved. However, I still find this extremely useful in retrieving a decent amount of emails to send marketing campaigns to.


In the right panel under the "Code Snippets" section, if you choose Python > Requests for the input field selection option and copy that code into your python program, you have something to work with. You can now modify the session_key with the session_key that you retrieved previously and run the API call. Once this is done, you can write the following lines of code:

js_obj=response.content.decode("utf-8")
py_obj=demjson.decode(js_obj)
list_of_public_emails.append(py_obj["data"]["user"]["public_email"]


This obviously requires that you declared a list variable list_of_public_emails where you can append the newly-acquired emails.

Difference Between Client-Sided (Front-End) Web Development Work and Server-Sided (Back-End) Web Development Work and the Tech Stacks Normally Used in Both

We will now cover the fundamental difference between client-sided web development (which is interchangable with front-end web development) and server-sided web development (which is interchangeable with back-end web development). The main difference between the two can actually be deduced from the naming itself: one is for front-end (what the user or client sees) and one is for back-end (what the user doesn't see and is done on the server).


Let's examine the difference between client-sided changes and server-sided changes using YouTube as an example. This web platform allows content creators to upload videos which are stored on YouTube's server. These videos also come with a comment section that users can comment on. Now, let's focus our attention to the comments section. If comments were not stored on the server (in a database), that means that after a user comments on the video, the user would see the changes take effect, but when the user refreshes the browser, the comment would disappear. This is because the comments being added (the change) were only taking effect on the client's side. When comments are stored on the server using a database like MySQL, when a client (any user of YouTube) accesses a video by URL, all the comments for that video are retrieved from the server's database. That means even if the client refreshes their browser to reload the page, the client's browser will do another request to the server for all the comments and will retrieve all the comments. This means that none of the changes will disappear. We will now examine the tech stacks commonly used in both kinds of web development.


An example of a popular tech stack that could be used for front-end web development is HTML5, CSS3, JavaScript, jQuery, AngularJS 8, Bootstrap 5, and AJAX. An example of a back-end web development tech stack is PHP 8, JSON, SQL, MariaDB, MySQL, Python 3.10.5, Selenium, and Heroku (for remote app deployment).


HTML5 is used to create the skeletal structure of the document which is composed of elements (called the Document Object Model). These HTML elements can have attributes with associated values and can also be nested. The elements can be styled using CCS3 and JavaScript or jQuery can be used to manipulate the elements on the client side. Bootstrap 5 is used to add flavour (styling) to the front-end web and AJAX is used to asynchronously retrieve responses to requests from the server so that the front-end web page can be changed without reloading the page. All versions of AngularJS are used as structurals frameworks for dynamic web apps. It lets you use HTML as your template language and lets you extend HTML's syntax to express your application's components clearly and succinctly. AngularJS's data binding and dependency injection eliminates much of the code you would otherwise have to write.


PHP 8 is used to work with back-end data—this means things like user account information (username, password, date of birth, etc.) for platforms that require user registration. PHP would be used to prepare SQL statements which would retrieve user records (each column of the row/record would be a property of the user record, e.g., username, password, date of birth, etc.) from a MySQL database. This retrieved data can be sent to the front-end from the server by converting the data into JSON which would make the data ready for transit. Once this data is on the front-end, it would be ready to be used (e.g., to display it on the front-end). An example of front-end display of this data would be displaying "Thank you for logging in, []" in the event of a user logging in and then the data (full name) of the retrieved user record data would go in the square brackets placeholder. Python 3.10.5 is a version of python which is also usually worked with on the server (back-end), but it can also be used as a standalone program to write simple python code. Selenium is an example of a module that can be used with python. It allows users to scrape dyanmic websites (websites that can be changed after the initial page load using JavaScript). Once data is scraped, they can be used to derive meaningful insights from the large amounts of data that was scraped. For example, in the case of scraping car prices on eBay for a specific make, model, and production year, once all the prices are scraped, the mean (average) can be found to find out the average price of that specific car. Heroku can be used to deploy, for example, a scraping app written in python (with selenium) which runs at regular time intervals (e.g., every 24 hours) and sends the scraped data to a remote MySQL database. This scraping app could work alongside a web app which uses the data which was scraped and sent to the MySQL database. The web app would retrieve the data from the MySQL database and sent it to the front-end of the web app, which could then be used for whatever purpose (e.g., displaying it on the front-end in a meaningful manner, e.g., in a table format organized by the datetime property of the data that was scraped).

How to Use XAMPP

XAMPP is a free and open-source cross-platform web server solution stack package developed by Apache Friends, consisting mainly of the Apache HTTP Server, MariaDB database, and interpreters for scripts written in the PHP and Perl programming languages. To use it, users should start by downloading and installing the program. After the installation process is completed, the program should be opened then MySQL and Apache should subsequently be turned on. If the user comes across any issues related to ports, it is most likely a result of the port being used by another program. The user is encouraged to make good use of search engines like Google to change the ports that Apache and MySQL listen to then restart Apache and MySQL. If the users come across any other technical issues, Google and Stack Overflow almost always solves all my technical issues.


After Apache and MySQL are running, the user should find where their htdocs folder is located. On my Mac OS X, the htdocs folder is in the following directory: /Applications/XAMPP/xamppfiles/htdocs. I created an alias or shortcut to that directory and put the alias on my desktop. Here, users can create a folder called TestProject and create a PHP file named index.php with inner contents that echo "Hello World!". The user can then open their browser of choice and navigate to localhost:[port]/TestProject/index.php (if the default port was used, localhost/TestProject/index.php should suffice). They will see the results here.

Using REST APIs

A REST API is an interface that allows you to access and manipulate data over the internet. It is a way for two computer systems to communicate with each other.


REST stands for Representational State Transfer. This means that each time you request data from a REST API, you are essentially asking for a representation of some state. The data that you receive in response is a representation of that state.


Each time you request data from a REST API, you are actually making a request to a server. This server then responds to your request with the data that you requested.


The data that is sent from the server to your computer is known as a resource. Each resource has a Uniform Resource Identifier (URI) that uniquely identifies it.


When you make a request to a REST API, you specify the resource that you want to access. The server then responds with the data for that resource.


REST APIs usually return data in one of two formats: XML or JSON. XML is a format that is used to represent data in a tree-like structure. JSON is a format that is used to represent data as a series of key-value pairs.


REST APIs can be used to access data from a variety of sources, including databases, file systems, and web services.


In order to use a REST API, you will need to have a program that can make HTTP requests. This program can be a web browser, a command-line tool, or a program that you write yourself.


Once you have a program that can make HTTP requests, you can use a REST API by making a request to the URI of the resource that you want to access. The server will then respond with the data for that resource.


REST APIs are a convenient way to access data over the internet. They are easy to use and allow you to access data from a variety of sources.

Themes and Existing Sites as a Starting Point

If you're starting out in web development, it can be tempting to try to build everything from scratch. However, themes and existing websites can be a great starting point, especially if you're working on a tight budget.


There are a number of benefits to using themes and existing websites as a starting point for your own project. First, it can save you a lot of time and effort. Rather than starting from scratch, you can simply adapt an existing design to suit your needs.


Second, it can be a great way to learn about web development. By working with an existing design, you can get a better understanding of how web development works and what is involved. This can be a valuable learning experience, even if you ultimately decide to build your own website from scratch.


Finally, using themes and existing websites can help you create a professional-looking website on a tight budget. If you're just starting out, you may not have the budget to hire a professional designer. However, by using a themes or an existing website, you can create a website that looks just as good as one that would have cost you thousands of dollars to have built from scratch.


Of course, there are also some drawbacks to using themes and existing websites. One is that you may not have as much control over the final product. If you're using a theme, you'll be limited to working within the confines of that design. And if you're using an existing website, you'll need to be careful not to violate any copyright laws.


Another potential downside is that it can be difficult to find high-quality themes and existing websites. There are a lot of low-quality designs out there, and it can be hard to weed them out. However, if you take the time to do your research, you should be able to find a few good options.


Ultimately, whether or not you use themes and existing websites as a starting point for your web development project is up to you. If you're on a tight budget and you're just starting out, it can be a great way to get your feet wet. However, if you're looking for complete control over the final product, you may want to consider building your website from scratch.

Difference Between Static Website and Dynamic Website

When it comes to building websites, there are two main types of site structures to choose from: static and dynamic. The main difference between the two is that static websites are typically made up of a small number of hand-coded HTML pages, while dynamic websites are generated by server-side scripts written in languages like PHP, Perl or ASP.


Static websites are the simplest to create and maintain – all you need is a basic understanding of HTML and a text editor like Notepad. Because they don’t rely on any server-side scripts, static sites can be hosted on any type of web server. They’re also much easier to develop, since all you need to do is create a few HTML pages and upload them to your server.


Dynamic websites, on the other hand, are generated on-the-fly by server-side scripts. This means that each time a user visits a dynamic website, the server runs the scripts and generates the HTML pages on the fly. Dynamic websites are usually more complex to create and maintain, since they require a good understanding of server-side scripting languages. However, they offer a much richer user experience, since they can offer features like user registration, shopping carts, and content management systems.


So, which type of website is right for you? It really depends on your needs. If you’re looking to create a simple website that doesn’t require any complex features, then a static website is probably your best bet. However, if you need a more robust website with dynamic content and user-friendly features, then a dynamic website is probably a better choice.

REST API Creation

REST, or REpresentational State Transfer, is an architectural style for providing standards between computer systems on the web, making it easier for systems to communicate with each other. REST-compliant systems, often called RESTful systems, can be accessed by other systems and software components using a uniform interface.


REST was first introduced by Roy Fielding in his 2000 doctoral dissertation, "Architectural Styles and the Design of Network-based Software Architectures", which identified and elaborated on six design constraints that were chosen to guide the development of the REST architectural style:


Client-server: The separation of concerns between the client, which requests resources, and the server, which responds to requests, improves portability and scalability by simplifying the server component.


Stateless: Each request from a client to a server must contain all of the information necessary for the server to fulfill the request. This eliminates the need for the server to maintain state information about the client, making it easier to scale.


Cacheable: Clients can cache responses from the server, which improves performance by eliminating the need to send requests for resources that have not changed.


Uniform interface: The uniform interface between clients and servers simplifies and improves the visibility of system components.


Layered system: The layered system architecture of REST allows for additional functionality to be added to the system without affecting existing components.


Code on demand (optional): Servers can provide executable code or scripts to clients, which allows for a more customized experience for the client.


REST is an architectural style, not a protocol. This means that there is no single standard that needs to be followed in order to be considered RESTful. However, there are a number of best practices and conventions that have emerged over the years.


One of the most important aspects of a RESTful API is the use of HTTP methods to indicate the type of operation being requested. The four most common HTTP methods are GET, POST, PUT, and DELETE.


GET: Used to request data from a server.


POST: Used to send data to a server.


PUT: Used to update data on a server.


DELETE: Used to delete data on a server.


In addition to the HTTP methods, a RESTful API also makes use of HTTP status codes to indicate the status of a request. The most common status codes are 200 (OK), 404 (Not Found), and 500 (Internal Server Error).


200 (OK): The request was successful and the data was returned.


404 (Not Found): The requested resource could not be found.


500 (Internal Server Error): An error occurred on the server and the request could not be completed.


In order to create a RESTful API, it is important to follow the principles of RESTful design. These principles include using resources, representations, and statelessness.


Resources: A resource is a piece of data that can be accessed by a client. A resource can be something as simple as a piece of text or a more complex data structure such as an image or a video.


Representations: A representation is a way of representing a resource so that it can be transmitted over a network. A representation can be in the form of JSON, XML, or HTML.


Statelessness: A stateless system is one in which each request from a client is independent of any other request. This means that the server does not need to maintain any state information about the client. Statelessness simplifies the design of a RESTful API and makes it easier to scale.